
The GPD Pocket, with hot dog and Strongbow shown for size reference.
[Update (12/4/2017): DO NOT run a “sudo dnf autoremove” command until you’ve read the update at the bottom of this post!]
[Update (12/4/2017): There have been some wonderful updates over the past month. I now consider this post to be deprecated and a new post is available here!]
I bought a new netbook computer a couple weeks ago, and it’s the cutest thing you ever did see. It’s called the GPD Pocket, and it is a full Windows 10 laptop about the size of a 7-inch tablet. The specs are impressive for the devices size: quad core processor, 8GB RAM, 128GB solid state hard drive, and as the name implies, it will literally fit in the pocket of one’s cargo shorts.
The first run of these machines was offered as a perk for supporting the GPD team’s Indegogo campaign. This experimental run has naturally come with bugs for some backers, but in exchange for this risk the early adopters received their Pockets for about $100 the final retail price of $497.17. Those backers who have experienced bugs are now receiving some support through the comments section of the Indegogo campaign. The GPD team will use the bug reports and feedback provided by the early adopters to polish off and make ready the units now being offered at retail through AliExpress.com.
If you are a genealogist on the go, like me, I think you’ll find this quite the handy little machine. I’m definitely bringing this one out with me on my next genealogy bike tour of Lancaster County, Pennsylvania. Heck. I might take it all the way to Pittsburgh!
The GPD team originally offered the Pocket in both Windows and Ubuntu Linux versions. Since I’m such a Linux nerd, I naturally requested the Ubuntu Linux version of the pocket. The Ubuntu firmware, however, has been held up in development for the past couple weeks, so the GPD team began shipping Windows versions of the Pocket to some of their Linux backers, with instruction to install the Ubuntu firmware when it becomes available. I have received the Windows 10 version of the Pocket, and I’m pleased to announce of the hardware that everything is in good working order, and I’m completely charmed by the device. Although the Ubuntu version of the machine is still not ready for production, I can confidently recommend buying the Windows 10 version based on my experience, and for the beginning Linux enthusiasts out there, I would recommend awaiting the announcement from the GPD team that the Ubuntu firmware is ready before purchasing your Ubuntu pre-installed version of the Pocket.
Of course, I never wait for anyone’s permission to go ahead and install Linux on a new computer, and I’ve made no exception for the Pocket. I’ve been tinkering with Fedora on the Pocket for the last couple weeks now, and my system is now just about ready for regular use. My genealogy followers can probably tune out the remainder of this post. Linux geeks: This one’s for you!
UPDATE, 7/17/2017: Now testing Linux Kernel 4.13-rc1! Read more below.
Dual Booting Fedora 26 and Windows 10 on the GPD Pocket
Linux on GPD Pocket is still in the experimental stages. In general, the device is simply too new and innovative for Linux to work out-of-the-box yet. Linux developers love nothing more than a good challenge, however, and they have wasted no time whipping up alpha and beta level software tweaks to get the Linux operating system usable on the Pocket. I reckon it won’t be long at all before these changes are accepted into the mainline Linux distributions.
I’m more of a Linux end user and beta tester than a developer. Most of what I’ll write here has been slightly adapted from the work of other brilliant Linux enthusiasts, notably a fellow named Hans de Goede, whom I have neither met nor heard of a week ago, but whose name now seems as familiar as that of a friend, and the gaggle of fellow enthusiasts on the Linux on GPD Pocket reddit topic. That thread is mostly geared toward installing Ubuntu, but at least one other user, Daniël van Eeden, is also working through Fedora. Daniël is savvier than I am, so I imagine I’ll be mostly just testing his innovations.
Why Fedora?
With the GPD team working overtime on Ubuntu firmware, and the Linux on GPD Pocket team wrangling with Ubuntu, why am I instead working on Fedora? The answer is simply that in all my years on Linux, I have never used Fedora before. Every time I try a new Linux distro, I learn a few more things about the operating system, and I wanted to continue that pattern with this new machine. Before I even received this machine, I had an idea that I wanted to use Fedora on it, so that’s what I have done, and I’m sticking with it!
First Step: Preparing your devices.
So you’ve ordered an Ubuntu-preinstalled GPD Pocket, but received a Windows 10 Pocket instead. What to do now? The first thing to do is prepare your Pocket’s internal drive with enough space to install Fedora.
Tap on the Windows key, type Partitions, and press Enter to launch the Windows partition manager. There are a couple small partitions for such tasks as booting and recovery. I left these alone because they are quite small. I wouldn’t gain much from removing them. I resized only the C:\ portion of the drive by right clicking it and selecting Shrink Volume from the menu. I reduced the C:\ drive by 90 Gigabytes, leaving about 28 Gigabytes for Windows. Of course, you are welcome to set your own proportions, and you’ll have to do some arithmetic to get it right. Close the partition manager when you are done.

Windows Disk Management, after Fedora has been installed, with a 1GB boot partition and an 89GB logical volume dedicated to Fedora.
Next you will need to create a bootable Fedora installation USB drive. Since the Pocket is so cutting edge, I would recommend eventually installing Fedora 26 beta, but there may be some problems with WiFi if you install that version directly. I’ve already had success installing Fedora 25 and then upgrading to 26, so that’s the method I’ll describe.
The Fedora website provides a USB installer app for Windows in the form of a downloadable executable (.exe file). Double-clicking this executable will install the app to the Pocket. Launching the app will then guide you through the process of creating a bootable Fedora installation medium on your USB drive.
As of this writing, Fedora 25 is the current officially supported version, with Fedora 26 due to be released in a few short days. If clicking Fedora Workstation invites you to install version 25, go ahead and do that. If clicking Fedora Workstation invites you to install version 26, then I would recommend instead downloading the Fedora 25 image from this location, and then clicking Custom image to create your Fedora boot medium. Again, the purpose of favoring Fedora 25 at this stage of installation is that the 4.11 kernel that ships with Fedora 26 contains a bug that prevents one from enabling WiFi on the Pocket. The 4.8 kernel that ships with Fedora 25 does not have the bug.

Fedora Media Writer, showing the creation of USB installation medium from a custom image.
You will need a USB drive larger than 1.3GB to create the bootable USB. That should not be a challenge to procure. Also, if you are a smartypants and you have your own favored method of creating bootable USB drives, be advised that the Pocket has a UEFI boot system, so do whatever you need to do to get that running. The Fedora Windows Installer seems to take care of it automatically, so I would recommend using that.
Boot into the Fedora installation medium
After the Fedora Windows Installed has completed its process, leave the USB in the drive and go through the normal Windows reboot procedure. As you see the GPD logo appear on the screen, press on the DEL key a few times to enter the Pocket’s BIOS. From BIOS, you can instruct the Pocket to boot from you USB installation medium. Once you see the BIOS screen, however, you’ll immediately understand one of the challenges of configuring Linux on the Pocket.
You see, it looks like the GPD team took a regular 7-inch tablet touchscreen, turned it sideways, and stuck it on a netbook chassis. The default orientation for this hardware is in the portrait mode, so we have some work ahead of us to turn everything into the landscape mode. In the meantime, during the installation process, just turn your head sideways a little bit to get through this stage of the installation.
Use the right and down arrow keys to navigate to the Boot Order section of the BIOS, and use + and – to change their order until UEFI USB … is at the top of the list. (You might also recognize the manufacturer of your USB drive on the same line. Mine is a PNY.) Once this is set, use Fn+F4 to save, exit, and continue with the boot procedure.
As the machine continues to boot, you’ll notice a few sideways Linux status messages, and then the screen will go black. This screen blackening is another one of the tribulations of installing Linux on the Pocket at this early stage, but a permanent fix is in the works, and we will be installing it. The temporary fix for now is to close the laptop screen when it turns black, wait some seconds, and then open it again. Get used to that motion. You’ll be doing it a lot until we enjoy the pleasure of installing a custom 4.12 Linux kernel that fixes the issue.
After you close and open the laptop screen as necessary, you should notice some more sideways Linux status messages, and then ultimately boot into the sideways Live Fedora installation environment. Once there, you can rotate the display 90 degrees to the right by tapping on the Windows key and typing Displays. The GNOME Displays Manager has the option to rotate the display. Once applied, though, you’ll encounter the screen of blackness once again. Open and close the clamshell as necessary to re-establish visuals—but do it quickly. You’ll have about 6 seconds to accept let the desktop environment know that you’re accepting the newly rotated setting. Use the Pocket’s mouse button to click on the selection; the touchscreen input is not yet calibrated!
Install Fedora to the Pocket’s hard drive
Now that you’re in a properly rotated installation environment, you may install Fedora to your system’s hard drive using the Anaconda installation wizard. You may access this wizard by pressing the Windows key and clicking the installation icon at left.
Using the wizard is straightfoward enough, but I would like to direct your attention to a couple settings that might improve your Fedora experience down the road.
The wizard will direct you to set the destination drive to which your Fedora operating system will be installed. While making that choice, take note of the option to manually configure partitions. Tedious as this is to do, you’ll want to do it. Choose “I will configure partitioning” to manually configure your Fedora partitions.

Choose “I will configure partitioning” to manually partition your Fedora installation.
You will next confront the Manual Partitioning dialogue. In the pink box at lower left, you should notice the amount of free space you allocated to your Fedora installation in the previous steps. (My space free space is tiny because I’ve already gone through the full installation process. There is hardly any space left on the device!) After noticing that, the first thing you will want to do is automatically create the mount points by clicking right where it says to click.

Take note of partitioning scheme and fedora-root partition size when configuring your partitions. I reduced my root partition size to 12 GB.
Next, you might like to choose your partitioning scheme. The default is set to LVM, with which I personally am most unfamiliar. I read up on it a little bit, and was impressed with the possibilities. The LVM stands for Logical Volume Management, and under this scheme one can do all kinds of tricks, like join together multiple drives to have your operating system read them together as a single drive. I would like to learn more about this technology, but my impression is that this scheme goes a bit overboard for the Pocket’s humble 128GB SSD.
The main trouble I’ve had with using LVM is that the partition editors with which I have become familiar, such as Parted, GParted, and GNOME Disks, can not edit or resize logical volumes. The Blivet-gui software seems to be able to do it, though I haven’t yet tried. Besides that, the command-line LVM tools seem to be the primary way to edit or resize logical volumes.
I stuck with LVM for my partitioning scheme because I like a challenge, but for a more simpler and more familiar partitioning scheme, you might like to change that to the Standard Partitions scheme.
One thing you’ll definitely want to change, though, while in the Manual Partitioning dialogue, is the size of the root partition (or logical volume, if you’re going that route). By default, the Anaconda installation tool sets the size of Fedora’s root partition to a whopping 50GB, apparently irrespective of how little space you may have allocated to your Fedora installation. In my case, I allocated 90GB to Fedora. With 50GB having gone to the root partition by default, and fewer than 40GB remaining for data in my home partition, I soon found myself running out of disk space and unable to store all of my genealogy files on the Pocket!
To avoid this tragedy, I advise drastically shrinking Fedora’s root partition, and then growing its home partition by the same amount. The amount you choose to shrink it will depend on how you intend to use Linux on your Pocket. If you see yourself using many various software applications, you might like a slightly larger root partition on which to install the applications. If you are like me, and you have a large amount of data but intend only to use a few programs, you might get away with a smaller root partition that leaves more room for data on your home partition.
If you read up the forums for what a good root partition size might be, you’ll see recommendations ranging from 10GB to 30GB. I personally settled on 12GB, thereby allocating and addtional 38GB to my home partition, which I found to be plenty of space to accommodate my genealogy documents.
After you resize your root and home partitions, go ahead and click Done to proceed with the installation of the operating system. You may notice while doing so that you computer has failed to connect to WiFi. No need to worry about that now. Fedora will install, all the same.
In the last steps of the installation, be sure to create a user and a super-user password. When installation completes, shut the pocket down, remove your installation media, and restart into your new Fedora installation! You will notice, of course, you will need to open and close the screen a bunch of times again while booting and rotating the screen. That’s not such a big deal and will be fixed shortly.
Enable WiFi
The Pocket will not connect to WiFi out of the box on Linux. It will find available networks and prompt the user for a password, but then it will go no further, and the connection will not occur. If you have successfully installed Fedora 25, you can enable WiFi by following the instructions offered by Mr. Hans de Goede at his blog. The trick is to copy this file, brcmfmac4356-pcie.txt, into your /lib/firmware/brcm folder and restart the machine. That’s it.
It worked for me on Fedora 25, which uses kernel 4.8, but won’t work on Fedora 26, which uses kernel 4.11. Be sure you’re using the right kernel.
Obviously, since you don’t yet have internet service in Fedora yet, you will have to go either to your Windows partition or to another computer to download the text file in question and bring it over to your Pocket’s Fedora installation. If you properly created your user and passwords during installation, then your sudo commands should be ready to help you copy the file. If you download the file under Windows, it should then be accessible through GNOME Files, under Local Disk/Users/yourusername/Downloads. Try copying the file from there to your Fedora installation’s Downloads folder. From there, you can try a command like:
$ sudo cp ~/Downloads/brcmfmac4356-pcie.txt /lib/firmware/brcm
to make the transfer. Don’t restart the machine quite yet, though. There is one more small chore we can do before we restart.
Set default boot options, including boot screen rotation
You can use the suggestions offered by the users at the Linux on GPD Pocket comment thread to prepare your boot process for proper rotation. The command:
$ sudo gedit /etc/default/grub
will open the necessary file for editing. I added the line:
GRUB_CMDLINE_LINUX_DEFAULT="i915.fastboot=1 fbcon=rotate:1 intel_pstate=disable"
as recommended. This line will correctly rotate the post-GRUB menu boot screen, although at least the intel_pstate option seems to be optional. After adding the line, save the file and close the editor.
Now restart the Pocket. You should be able to log in and connect to a WiFi network.
Enable the fan
Linux will not enable the Pocket’s fan out-of-the-box, but Reddit users ErikaFluff and Stockmind have developed scripts to get the fan moving. In my experience, the Pocket actually runs Linux well enough without the fan. I was actually able to compile the 4.12 kernel—a six-hour, intensive computing operation—without any problems before I ever got the fan to spin. Others on Reddit have reported crashes and stoppages believed to have been related to overheating. In any case, since the performance benefit of a fan-cooled, quad-core processor was one of the selling points distinguishing the Pocket from regular 7-inch tablets, I figured that starting the fan should be a priority. To accomplish that, first there are some Perl dependencies to install:
$ sudo dnf check-update
$ sudo dnf install perl-Proc-Daemon perl-Proc-PID-File perl-Log-Dispatch
Next, fetch Stockmind’s installation script from Github Gist [dead link]. You can right-click on the Raw button, and choose Save Link As to save the file. I used sh to execute the script:
$ sudo sh ~/Downloads/install.sh
This will download ErikaFluff’s service scripts and installs them in the proper places. To enable the fan at boot and start it, issue these commands:
$ sudo systemctl enable gpdfand
$ sudo systemctl start gpdfand
You should hear your fan whir to a start, and the fan should start on subsequent boots. Any files automatically downloaded to the Downloads folder during this process can be deleted.
Update the Fedora 25 system
With the fan hopefully now spinning you can now perform such heavy tasks as system updates in comfort. Issue these commands:
$ sudo dnf check-update
$ sudo dnf upgrade
The upgrade will take some time, after which you may then upgrade the system to Fedora 26.
Upgrade the system to Fedora 26
To upgrade to Fedora 26, follow the instructions available at The Fedora Project. In short, issue these commands after bringing your Fedora 25 installation up to date:
$ sudo dnf install dnf-plugin-system-upgrade
$ sudo rpm --import /etc/pki/rpm-gpg/RPM-GPG-KEY-fedora-27-primary
$ sudo dnf system-upgrade download --refresh --releasever=26
$ sudo dnf system-upgrade reboot
The last command will cause your computer to reboot. The scheduled upgrade will then occur during the reboot process. When your computer reboots, however, you may find that the prior update has placed some new Linux 4.11 kernels in the GRUB menu. Avoid them. Remember to select the 4.8 kernel; this is the only kernel under which WiFi will still work.
Install Hans de Goede’s custom Linux 4.12.0 kernel:
This custom 4.12.0 kernel will provide improved bootup and shutdown, more consistent screen performance (no more black screen), debugged WiFi, and a battery monitor. Hans has provided some instruction for installing his kernel over at his blog, but I’ve found the need for a couple minor tweaks on the Fedora system.
We’ll need some development dependencies to get the compiler to complete the process. Try these:
$ sudo dnf install elfutils-libelf-devel openssl-devel
Enter your Downloads folder, and then fetch the kernel source
$ cd ~/Downloads
$ git clone https://github.com/jwrdegoede/linux-sunxi.git
This will download the kernel source into a folder called linux-sunxi. We are going to enter that folder and edit the .config file. There is a module in there that seems to break the system’s audio at this stage of development. I would like to remove that module until I catch wind that it has been is fixed. Try this:
$ cd linux-sunxi
$ gedit .config
This will open a text editor where you can make the necessary change to the config. Use Ctrl-F to find the line CONFIG_HDMI_LPE_AUDIO=m. Comment that line out by typing a hash (#) and a space in front of it, as you see it has been done a few lines above. Use Ctrl-S to save the file, and then close the editor.
Now use the simple instructions here to make and install the kernel:
$ make all
You will be prompted to confirm that you do not want to install the HDMI audio without HDaudio on Intel Atom platforms module, which we have just removed from .config. Type N to confirm that you do not want it. I suspect that this module is important for HDMI audio output, which I have not yet had occasion to test. It’s not a deal breaker for me, because I don’t see myself ever using HDMI audio output for what I do, but others will surely want it.
The make all command takes quite some time to complete. Mine took a good six hours, from quarter to eleven in the morning clear until a quarter to four in the afternoon. Feel free go for a walk, go to the thrift store, go to the beach, or read a good book. Once the compiling is all done, issue the following commands to install the new kernel:
$ sudo make modules_install
$ sudo make install
Finally, reconfigure the GRUB bootloader to detect your new kernel at boot:
$ sudo grub2-mkconfig -o /boot/efi/EFI/fedora/grub.cfg
In distributions past, I’ve always been required to follow this step with an installation command such as grub2-install /dev/sda. Apparently this is unnecessary on UEFI systems like the Pocket, so don’t even bother! Just go ahead and reboot the system. using either sudo reboot, or the GNOME Desktop’s shutdown controls. The shutdown process is still quite unclean at this point, which is one of the problems the 4.12 kernel is intended to remedy. The screen will be black for a while. Feel free to kill it after a while by holding down the power button. I did. Then reboot.
Congratulations! You should now have clean boot process, replete with sideways Fedora splash, and a slick new battery monitor. Cool!
Rotate touchscreen input
One of the problems thus far for me in the Fedora configuration process has been the failure of the Pocket’s touchscreen input to rotate along with the display. I spent several days searching for a solution to this problem, before re-installing the system from scratch to resize the root partition. After re-installing the system, re-downloading, and re-compiling the Hans de Goede’s Linux 4.12 kernel, I found the problem of touchscreen input rotation to have been resolved without any further effort from me. However, if you find that the touchscreen input has not corrected itself upon rotating the display, you may attempt this solution:
First, copy this file, 99-touchscreen-rotate.conf, into the folder /etc/X11/xorg.conf.d.
Then, either re-start the Pocket or log out of your user. When you return to your (still sideways) login screen, click your username. Before typing your password, click the settings gear and choose Gnome Xorg from the sessions menu. Then type your password to start a Gnome Xorg session.
You may notice the desktop features become tiny when starting your Gnome Xorg session. If that is the case, you may scale the features with this command:
$ gsettings set org.gnome.desktop.interface scaling-factor 2
A GUI application call dconf-editor can also help you change the setting. If the touchscreen orientation was not correct before, it should be correct now, and with that—the CPU fan enabled and a properly oriented touchscreen—your pocket should be mostly ready to begin everyday use!
Rotate the login screen
An application called GDM supplies Fedora’s login screen, and unfortunately it does not abide by the same rules and the main desktop session. Some further tweaks are necessary to rotate that correctly.
First, as described in this bug report, disable Wayland on the login screen by editing the custom configuration file:
$ sudo gedit /etc/gdm/custom.conf
Where the file says, “Uncomment the line below to force the login screen to use Xorg.” Do that by removing the hash, or pound sign, that begins the next line:
# WaylandEnable=false
Save the file and quit the editor. Once that is done, download Stockmind’s monitors.xml file and copy it to the /var/lib/gdm/.config directory. This should take care of the rotation, but you may notice again that the features of the login screen display tinily after disabling Wayland. Use the process described here to change the scaling. First edit the schema file:
$ sudo gedit /usr/share/glib-2.0/schemas/org.gnome.desktop.interface.gschema.xml
By my count, line 122 of this file controls the scaling. Use Ctrl-F to find the line with the search term name=”scaling-factor”, and then change the number between the <default> tags to 2. Save the file and exit the editor.
Lastly, recompile the schemas with this command:
$ sudo glib-compile-schemas /usr/share/glib-2.0/schemas
Your login screen should now be properly rotated, however, touch input on the login screen has not yet been rotated to match the visuals. Unfortunately, I have not yet found a solution to this sticky problem, but since I don’t see myself touching around a whole lot on the login screen, this is not a deal breaker for me.
Make kernel 4.12 the default GRUB entry
You might notice during the course of booting and rebooting your system that the preferred kernel in GRUB menu, 4.12, does not necessarily get properly highlighted by default and therefore must under some circumstances be manually selected using the arrow and Enter keys. This will be especially true after your system upgrades its native 4.11 kernel, which is not as useful to us yet as the 4.12 kernel. This mishap may be remedied by following the instructions here. First, edit the grub default file:
$ sudo gedit /etc/default/grub
Add these lines, if they don’t already exist, then close the editor:
GRUB_DEFAULT=saved
GRUB_SAVEDEFAULT=false
Apply the changes by running the following command:
$ sudo grub2-mkconfig -o /boot/efi/EFI/fedora/grub.cfg
Lastly set the default kernel to Hans de Goede’s 4.12 kernel by issuing this command:
$ sudo grub2-set-default "Fedora (4.12.0-rc7+) 26 (Workstation Edition)"
You should no longer need to use the arrow keys to manually select the 4.12 kernel. Note however that this fix does nothing to rotate the GRUB menu. I believe that problem has yet to be solved.
Enable the Pocket’s brightness keys
The Pocket’s brightness keys do not work out-of-the-box under Linux. Hans de Goede has suggested a simple fix. Just issue the following command:
$ sudo dracut -f --add-drivers "pwm-lpss pwm-lpss-platform" /boot/initramfs-$(uname -r).img $(uname -r)
Since this applies the proper driver to the currently running kernel, it will surely need to be reissued after each kernel update. Not a big deal.
Enable Bluetooth
Out-of-the-box, Fedora will not find the Pocket’s Bluetooth device. Daniël van Eeden, has suggested a workaround, which is to create this file:
$ sudo gedit /etc/rc.d/rc.local
and type this information into it:
#!/bin/bash
modprobe btusb
echo "0000 0000" > /sys/bus/usb/drivers/btusb/new_id
exit 0
After saving the file and quitting the editor, make it executable and enable startup at boot:
$ sudo chmod 755 /etc/rc.d/rc.local
$ sudo systemctl enable rc-local
When I did this for myself, I got some ominous looking warnings about certain things being missing, but ultimately the method seemed to work. I now have Bluetooth enabled.
Reddit user Stockmind, over at the Linux on GPD Pocket thread, had an alternative method for enabling Bluetooth, which was to copy this file, 99-local-bluetooth.rules, to the folder /etc/udev/rules.d. I personally had greater success with Daniël’s method, but some users will surely find Stockmind’s method helpful.
My Bluetooth mouse now works, but unfortunately I have not yet achieved sound over my Bluetooth headphones. This seems more like a sound configuration bug than a Bluetooth bug, since the headphones do seem to connect.
By the way, Fedora supplies a Bluetooth Manager that offers more comprehensive information and options for your Bluetooth devices. I recommend installing and giving it a try:
$ sudo dnf install blueman
Some non-Pocket related multimedia fixes
Since the space is so limited on the dual-booted GPD Pocket, I won’t be able to transfer all of my music to it. I therefore intend to make greater use of the music I have stored on Google Play.
To that end, I found installing Adobe Flash to be necessary. This might be accomplished by installing and running the Google Chrome browser, which comes with Flash pre-packaged. For the past five years, this was the only true option for using Adobe Flash on Linux without engaging in undue hacks that I never seemed to be able to pull off. Last fall, however, Adobe issued the version 26 of the Flash player, which is the first version to officially support Linux since version 11.2 was released in 2012. Since I’m trying not to install too many extra large applications on my limited root partition, I’ve chosen to stick with Fedora’s native applications, including the Firefox browser, as much as possible. Using Google Play on Firefox entails installing Flash player via Adobe’s web site.
The version you should choose to download from the site is “YUM for Linux”. Once the package is downloaded, you may install it by issuing this command:
$ sudo rpm -ivh ~/Downloads/adobe-release-x86_64-1.0-1.noarch.rpm
This package does not actually install Adobe’s Flash player, though. It installs only the GPG key to Adobe’s software repository. To complete the installation of the Flash Player issue these commands:
$ sudo rpm –import /etc/pki/rpm-gpg/RPM-GPG-KEY-adobe-linux
$ sudo dnf install flash-plugin
This will not only install the current version of Flash Player, it will also install updates as they become available, along with your other system updates.
Next, I wanted to be able to use Fedora’s Rhythmbox music app to listen to my favorite internet radio stations. This required the installation of the standard .mp3 codecs. There are a few ways to do this, and this time I opted for the most patent-friendly method, which is downloading and installing the free OnePlay MP3 Decoder from Fluendo.com. Abiding by international patent laws will cost you your contact information, but eh … whatever. After downloading, install using this command:
$ sudo rpm -ivh ~/Downloads/oneplay-gstreamer-codecs-mp3-21-6.x86_64.rpm
Permanently scale Firefox websites to 90%
Now we’re getting to the fine details. This is a matter of preference, but I have found many websites to load just a little too large under Firefox, thereby not fitting within the screen, horizontally. Firefox does not seem to have a default zoom setting, so I added this functionality through the Zoom Page add-on. Once installed, the Default Zoom (%) option is under the Zoom Levels tab in the Zoom Page Options dialogue. I set it to 90. I also went with the Minimal Layout button style under the General tab to preserve precious toolbar real estate.
Install the righteous animated Fedora 26 desktop background
Sure, the silhouetted nature scene of Fedora 26’s default desktop background is pretty, but wait until you see it come to life. To get it, try this command:
$ sudo dnf install f26-backgrounds-animated
Then set the animated background through Gnome Settings clicking the down arrow in the upper right, clicking the settings icon, and clicking Backgrounds. Choose the new version of the background, with the little clock in the corner, then be amazed at how the virtual sun rises and sets over your new dual-boot Windows/Fedora GPD Pocket! Of course, be sure to change both the desktop background and the lock screen background.

The animated Fedora 26 background, during the overnight hours.
One side effect of changing the default background is the loss of the Fedora logo at bottom right. Surely, you will want that back to show it off to all of your friends. To get the logo back, press the Windows key and type Tweak Tool. The GNOME shell will invite you to install the said Tweak Tool, which offers a few extra settings to tweak your desktop. Once installed, launch the Tweak Tool and, under Extensions, find the Background Logo extension and click the gear to edit its settings. You may find that the window gets cut off at the bottom. Hold down the Windows key and drag the window up to reveal one more hidden setting: The “Show for all backgrounds” check box. Check that box to restore the Fedora logo, and make it a little bigger while you’re at it. You’ll want all your friends to see it!
This animated background is such a tough act to follow, I’m not quite sure what I’m going to do when Fedora 27 beta comes out with a new background. How will the Fedora team top this?
The things I haven’t gotten working yet
After all the adjustments mentioned above, I’m quite pleased and satisfied to say that I have a GPD Pocket that runs Linux well enough for me to do all the tasks I need it to—and support will only improve in the coming months. I can’t hardly wait to take it with me on my next multi-day genealogy cycling adventure!
That said, there are still some issues left for me to test and resolve. This is not to say that there are no solutions to these issues. I personally either haven’t succeeded or just haven’t tried:
- USB-C data connection: Linux apparently doesn’t support this yet at all in any stable distributions, but there is apparently active development in this area. Future versions of the Linux kernel will support it.
- Sound over Bluetooth headphones: Gotta be a sound card issue.
- Rotate the GRUB boot menu: I don’t know if anyone on Reddit has gotten the GRUB menu rotated yet. I haven’t tried.
- Rotate the splash screen: Since day one, the Redditors have recommended disabling splash. I never did that. I like the splash, but I’d also like to see it rotated correctly. I haven’t yet tried to rotate it.
- Rotate touch input at the login screen: I use it so infrequently, I might forget it’s a problem before I ever solve it.
- HDMI output: I have not tested this at all. I suspect HDMI sound output will be lacking so long as the snd_hdmi_lpe_audio module is disabled, but I really don’t know. I haven’t tested it. I don’t even have the right cable for it.
Lastly, for all of my Genealogy followers…
…who somehow made it to the bottom of this post: You’ll surely want to install the GRAMPS Genealogy software, won’t you? The command to install GRAMPS in Fedora, along with the dependencies needed for the Graph View, is:
$ sudo dnf install goocanvas2 pygoocanvas gramps
Enjoy!

The GPD Pocket, running Fedora 26 beta and GRAMPS.
UPDATE, 7/17/2017: The sought after Linux 4.13-rc1 Linux kernel, rumored to include more support for the GPD Pocket’s hardware, was released two days ago. Of course I’ve taken it for a spin. I downloaded the and compiled the source from the front page of Kernel.org, copying Hans de Goede’s .config file from the linux-sunxi folder created above. Upon issuing the make all command, there were several new options to set I believe I chose Yes to enable support for the first option, because it sounded cool, like something I might use some day. From then on, I figured that if I specifically recognized it as a piece of Pocket hardware, I’d choose yes, and otherwise I’d choose the default setting. After compiling and testing, here is what I have to report. First the good news:
- Fan service seems to work, even with gpdfand (installed above) disabled.
- Bluetooth service seems to work, even with rc-local (installed above) disabled.
- Login screen touch input is now rotated correctly.
Now for the not-so-great news:
- When the splash screen works, it is still not rotated correctly.
- When it doesn’t work, the splash screen often goes black. We seem to have reverted at times to the old behavior of needing to open and close the clam shell computer screen to re-awaken it at the now-correctly-rotated login screen. It doesn’t happen all the time. I wonder what the pattern is?
- The module snd_hdmi_lpe_audio still breaks the sound and still must be removed from the kernel .config file.
- USB-C Data still doesn’t seem to work, despite there being some kernel modules enabled to that end.
- This is the deal beaker: Kernel 4.13-rc1 is awfully crashy. About a third of the time, it crashes on login. The rest of the time, it’s bound to crash sometime while I’m surfing the web. Sounds bad, but hey: They don’t call it unstable for nothin’!
Besides this stuff, I do have one more observation to make. I haven’t tested this under Windows, but under Fedora Linux the charging of the device is definitely a little janky. When the unit is on while plugged in, it doesn’t get a very good charge. If the unit is busy, say compiling a kernel, the battery charge actually goes down while the unit is plugged in. Oddly, I don’t think I’ve ever had it shut down on me while compiling a kernel. When the kernel is done compiling, thought, I might find the battery charge down to about 3%, especially if the battery was already low when I started the process.
The Pocket will not boot if the battery is too low, whether it is plugged in or not. If the battery runs down too low, you’ve got to charge it for a while before it will boot again. A phone-like battery screen (rotated incorrectly, of course) will indicate the charge instead, and the boot process won’t proceed beyond that screen until the charge gets up into the double digits or so.
The surest way to charge the device, at least when booting exclusively into Linux, is to turn the unit off completely and let it charge that way either overnight or while I’m away at work. When I return to the unit after that, the charge is always back up to a reliable 100%.
After that, the battery life is quite comfortable, in my opinion. Some folks on the Indiegogo campaign web site have complained that they are disappointed in the battery life, or at least that it was not as long as advertised. The battery usually seems to get me though the evening, so I usually don’t run into any battery life problems before turning in for the night. I just have to remember to turn my unit all the way off if I want it to be reliably charged in the morning. Again, I haven’t tested this under Windows, but when running Linux exclusively it seems to be the case.
UPDATE 12/4/2017: I ran into a pretty serious problem with my system this week, caused by an attempted system cleanup. After an upgrade, the “sudo dnf autoremove” can remove obsolete packages from your system. I would normally recommend executing this command after an upgrade, but last week this got me into a bit of trouble. You see, for some reason, the autoremove command now deletes the grub2-efi package and its dependencies. Apparently, your UEFI system needs this package to secure boot non-standard kernels.
When autoremove removes the grub2-efi package, the system will no longer secure boot. It will instead ask you to find an MOK, or Machine Owner Key somewhere on your system. Either the system I built above has no such key, or I don’t know where to find it. The way I understand it, Fedora’s stock kernels come with all the signatures and keys needed to satisfy the UEFI secure boot system. When we start building our own kernels, as I did above, the UEFI secure boot system is not longer satisfied with with the state of the signatures and keys, and it refuses to boot until such signatures or keys are provided. If you haven’t got any keys, you might be out of luck.
The easiest way to prevent this mishap from occurring is to manually reinstall the grub2-related packages that autoremove removes. First, run through the autoremove command:
sudo dnf autoremove
The command will return a list of packages to be removed and ask for a confirmation. Scroll up the list of packages to confirm the grub2-related packages that will be removed. My list looked like this:
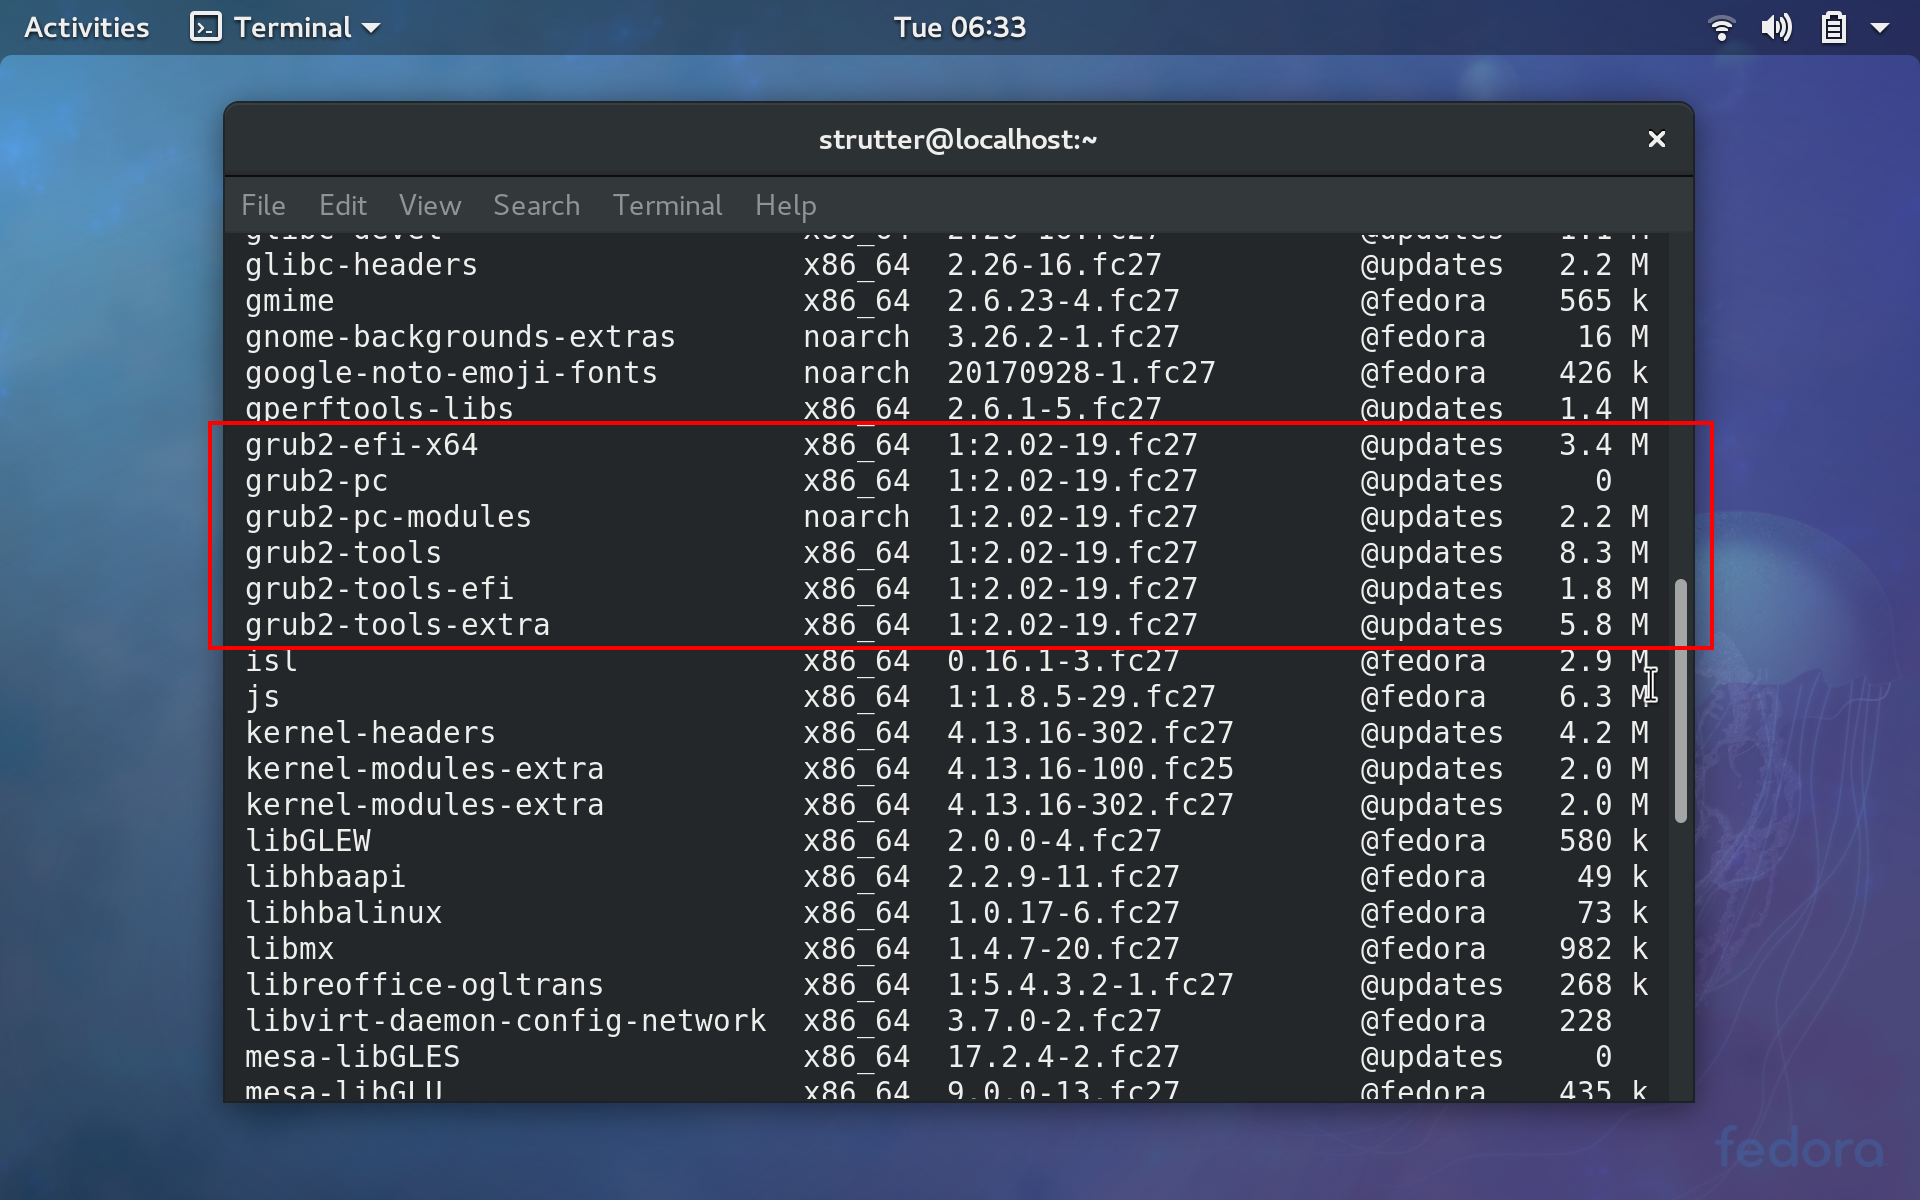
I’m not sure exactly which of these grub2-related packages is the cause of the problem, but these are the packages I restored after autoremove removed them.
Go ahead and confirm the autoremove. Watch all of these packages disappear. Then, BEFORE YOU REBOOT YOUR COMPUTER, be sure to replace the grub2-related packages in your list, as in the example above:
sudo dnf install grub2-efi-x64 grub2-pc grub2-pc-modules grub2-tools grub2-tools-efi grub2-tools-extra
You’ll find that some of these are dependent on others, but that’s the list of packages I replaced. Only after replacing those packages should you reboot your Pocket and make sure everything is in order. (If it isn’t in order, I don’t know what to tell you, but this did work for me!) Now that the grub2-related packages have been manually installed, you should be able to run autoremove in the future without fear of having these important packages removed. In fact, give it a try after reboot. DNF should report back that there is nothing left to remove!
Two other ways to possibly prevent this mishap from occurring, which I haven’t tested, are:
- Disable “Secure Boot” in BIOS: Apparently this is a thing, but I’ve got no idea how to do it on the Pocket.
- Generate MOK keys and sign your binaries when you compile your custom kernels. If that sounded like it made no sense, it’s because I’ve got no idea what I’m talking about.
Further information on both of these methods is on this page, through I haven’t myself gone through the processes well enough for them to bear fruit. Keep in mind, also, that if perfected, these methods have the potential of actually fixing the problem, if you happened to encounter the problem without having prepared beforehand. Disabling “Secure Boot”, if possible, should fix the problem immediately. Generating MOK keys, etc., could work, if done from a chroot environment. I tried it once without success, but I now believe that I did not rightly get all the way through the instructions on the page.
[One method that might fix the problem is reinstalling the removed grub2-related packages from the chroot environment, using a boot disk. I couldn’t avail myself of this method at first, because I did not then take care to note the grub2-related packages that needed to be replaced. I suppose I could perform that experiment to see if that would work, now that I have retained a screenshot of the needed packages. I’m not in a hurry to do that now, though. I’m really just glad to have my computer up and running again. I think I’ll keep it the way it is. 😉 ]
I personally haven’t yet been able to fix this boot problem to get my system booting once again. What I have been able to do, however, recover my data through a bootable USB before reinstalling the Fedora operating system. The process for that is as follows:
You’ll need a USB boot drive. The one you made above to install Fedora in the first place will work great, but basically any half decent linux distro on a bootable USB that can get you to a terminal will do. On top of that, you’ll probably need a second USB drive on which to store your data. (The Fedora USB made above will not have formatted additional space for your data unless you went through some extra steps.) Lastly, you’ll need a USB hub so you can plug both drives into the pocket at once.
Plug your hub into the Pocket’s USB slot, and then plug your bootable USB into one of the slots on the hub. Power up the Pocket and enter BIOS so that you can boot from the USB as described above. Rotate the screen and all that jazz, and then get to a terminal. If you are using the Fedora installation medium, just hit the windows key and type “Terminal” in the GNOME shell. Plug in your second USB drive—the one you are using to recover your data. You are now ready to type some commands.
# su
# mount /dev/fedora/root /mnt
# mount /dev/fedora/home/ /mnt/home
# nautilus
If you are using your Fedora installation boot drive, or any other GNOME-based boot drive, the “nautilus” command should launch the file manager from which you should be able to copy your precious data over to your second USB drive. In my case, I simply copied my entire home folder to a 128 GB flash to sort out later. (Note: If you need to preserve any symbolic links, you will have to format your blank flash drive to an ext format before beginning this process. Most flash drives come from the store formatted to a FAT format, which can not preserve symbolic links.)
With all of your data safely copied to flash, you may now re-install the Fedora operating system. Close nautilus to return to your terminal. Type:
# fdisk /dev/mmcblk0
to edit your hard disk. Type p at the prompt to print a list of your hard drive’s partitions. From there, type d to begin deleting partitions. You will be prompted for the number of the partition you want to delete. You can delete all your Linux partitions to make room for the reinstallation. (NOTE: If you are dual-booting Linux and Windows, be VERY CAREFUL not to delete either your Windows partition or your Windows EFI boot partition. If you mess up and accidentally delete your Windows partition(s), GPD did send out a Windows firmware image that may be helpful to reinstall Windows. I haven’t tried it yet, so I can’t vouch for it, or the process of using it. If you have any doubts you would do well to back up all of your Windows data as well before deleting your Linux partitions.) After you have used d to delete your partitions, type w and press enter to make your changes permanent and quit fdisk. You may now restart your system and reinstall Fedora as above.


Leave a Reply